Click Search the Internet
 button on the toolbar,
and ConceptDraw will launch the searcher in the browser which is available in
your system.
button on the toolbar,
and ConceptDraw will launch the searcher in the browser which is available in
your system.ConceptDraw provides you with extended Internet integration: you can create and use hyperlinks, send documents via E-mail, and save your drawings in HTML format to place them on the Web easily.
Sending a Document by E-mail
Searching the Internet
Using Hyperlinks
Exporting a Document to HTML Files
Working with Documents on a Remote FTP-Server
You can e-mail your documents from within ConceptDraw.
Open (or make active) the document you need to e-mail, and choose the Send
via E-Mail command from the File menu.
A new e-mail message will be created in the default mail client. The document
will be attached to this message. Specify the e-mail address to which you want
to send the document and add your comments in the body of the message if necessary.
To send the message, click the corresponding button in the mail program (usually
the Send button).
ConceptDraw allows you to launch an Internet search from the application.
Click Search the Internet button on the toolbar,
and ConceptDraw will launch the searcher in the browser which is available in
your system.
You can set which Internet browser and search engine should
be addressed by default:
Call the Edit / Preferences dialog, and use the Paths
tab to configure these settings.
For more information about the Preferences dialog see Dialogs - Modal dialogs - Preferences.
ConceptDraw lets you link your drawings to other documents or Web pages, as well as to other files and programs, providing quick access to data of various kinds. A hyperlink can be assigned to any shape in your document.
You can assign and edit the hyperlinks of the shapes by using the Hyperlink dialog. It lets you create hyperlinks of different types or disable the hyperlink. You can also create the links to Internet and e-mail addresses by typing them directly in the shape's text. To do this, enable the Mark hyperlinks in text option in the Preferences dialog, the View tab. The program will recognize the addresses in the text and assign the hyperlink to the shape.
ConceptDraw looks for the following words in the text:
"http://"
"https://"
"www."
"mailto:"
"ftp://"
"news:"
"file://"
"gopher://"
"telnet:"
"wais:"
All the text after such word up to the first space will be treated as a hyperlink.
This is an easy and useful way of assigning hyperlinks to shapes if the destination is an Internet or e-mail address which should be visible in the document. To delete or re-assign the hyperlink, use the Hyperlink dialog.
To open a hyperlink, double-click on the shape when
the mouse cursor turns into  .
.
To edit a text hyperlink, select the shape and press F2 to activate the text editing mode. When you finish editing (click outside the shape), the software will recognize the new hyperlink automatically.
Besides e-mail and Internet addresses, you can link your document to another page or shape in the document, another ConceptDraw document, or to any other file or application. To create and edit hyperlinks of all kinds, you can use the Hyperlink dialog.
To assign a hyperlink to a shape, or to edit the existing link:
1. Select the shape.
2. Open the Format / Hyperlink menu, and select the Edit
option.
You can also get this command from the shape's context
menu, or use the keyboard:
 Ctrl + Shift
+ E Ctrl + Shift
+ E |
 Cmd
+ Shift + E Cmd
+ Shift + E |
The Hyperlink dialog will come up for you to specify the destination of the hyperlink.
To open a hyperlink, you can use one of
the following alternatives:
a) double-click the shape when the mouse cursor turns into ;
b) get the context menu of the shape and use the Hyperlink / Open
command (also available from the Format menu),
c) select the shape and use the Open Hyperlink button  on the Web
toolbar.
on the Web
toolbar.
d) select the shape and use the keyboard:
| Ctrl + Shift
+ H |
Cmd + Shift
+ H |
For more information about the Hyperlink dialog see Dialogs
- Modal Dialogs - Hyperlink.
For more information about the Web toolbar see Toolbars - Web.
ConceptDraw lets you export your drawings to HTML to place them on the Web easily.
To save a document in the HTML format, use the File / Export / HTML
menu.
If you need to export only the particular shapes on the page, select
them before exporting.
In ConceptDraw, the HTML export is highly customizable. You can configure the HTML export settings in the HTML Properties dialog, which appears during exporting.
More information about the HTML Properties dialog can be found in the Dialogs - Modal Dialogs - HTML Properties section.
When more than one person works with a document, it's a good idea to store the document on a file server, so that other members of the workgroup have access to the latest version of the document.
ConceptDraw supports working with documents, located on a remote computer (server). The server is accessed via the FTP protocol. The built-in FTP client allows to pick the documents up from the server for editing, and then put them back without leaving ConceptDraw.
To edit a document, located on the server, from the File menu select Open from FTP Server. The Open from FTP Server dialog will come up.
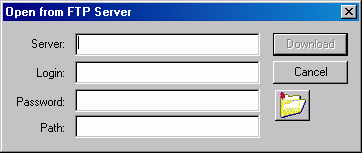
The Server field contains the name of the server, where your
documents are stored. The fields Login and Password are used
for user identification. In the Path field you specify which
document you are going to edit and where it's located.
On clicking Download, the document will be copied to your computer
and opened for editing.
To save the document to the FTP server, select Save to FTP Server from the File menu. The Save to FTP Server will appear.
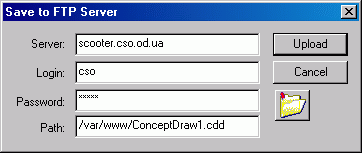
All its fields are the same as in the dialog described above.
If you work with a document regularly, it's convenient to save all access settings
in Bookmarks. To do this, press the Bookmarks button  in the upper right corner of the access settings dialog. A drop-down menu will
come, where you can choose or edit existing bookmarks, or add a new one.
in the upper right corner of the access settings dialog. A drop-down menu will
come, where you can choose or edit existing bookmarks, or add a new one.
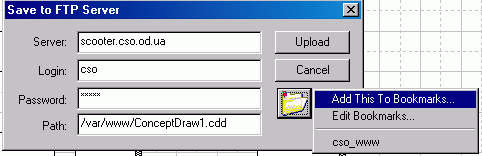
 By
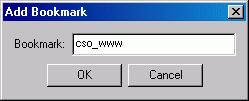
choosing Add This To Bookmarks... you can add the new bookmark
to the list of existing ones. The parameters, which are displayed on the dialog,
are remembered in the bookmark. The Add Bookmark dialog will
come up, where you can enter the name of the bookmark. When you select a bookmark,
the settings stored in it are automatically put in the corresponding fields
of the dialog. To edit an existing bookmark, choose Edit Bookmarks....
The Edit Bookmarks dialog will come up where you can edit previously
saved bookmarks.
By
choosing Add This To Bookmarks... you can add the new bookmark
to the list of existing ones. The parameters, which are displayed on the dialog,
are remembered in the bookmark. The Add Bookmark dialog will
come up, where you can enter the name of the bookmark. When you select a bookmark,
the settings stored in it are automatically put in the corresponding fields
of the dialog. To edit an existing bookmark, choose Edit Bookmarks....
The Edit Bookmarks dialog will come up where you can edit previously
saved bookmarks.
Note: Bookmarks are stored with the application settings and can't be transferred from one computer to another.
For more information:
about the Open from FTP Server dialog - see Dialogs
- Modal Dialogs - Open From FTP Server,
about the Save to FTP Server dialog - see Dialogs -
Modal Dialogs - Save To FTP Server,
about the Add Bookmark dialog - see Dialogs - Modal
Dialogs - Add Bookmark,
about the Edit Bookmarks dialog - see Dialogs - Modal
Dialogs - Edit Bookmarks.